How to Build a Gaming PC: Your Ultimate DIY Guide
how to build a gaming PC

How to Build a Gaming PC: Your Ultimate DIY Guide

Unlock unparalleled gaming performance and save money by assembling your own custom gaming PC with confidence.

Start Building Now

Key Takeaways

  • ✓ Building your own gaming PC can save you money compared to pre-built systems.
  • ✓ You gain full control over component selection, optimizing for performance and aesthetics.
  • ✓ The process is more accessible than ever, with abundant online resources and guides.
  • ✓ Understanding your PC's hardware empowers you for future upgrades and troubleshooting.

How It Works

1
Plan Your Build & Budget

Determine your performance goals (e.g., 1080p, 1440p, 4K gaming) and allocate a realistic budget across essential components like the CPU, GPU, and motherboard.

2
Gather Your Components

Purchase all necessary parts, including the CPU, GPU, RAM, storage, motherboard, power supply, case, and cooling solutions. Ensure compatibility using online tools.

3
Assemble the Core System

Install the CPU, CPU cooler, RAM, and M.2 SSD onto the motherboard outside the case. This makes initial installation easier and helps avoid potential issues.

4
Final Assembly & Cable Management

Mount the motherboard into the case, install the GPU, connect all power cables, and manage them neatly for optimal airflow and aesthetics. Perform initial boot-up.

Understanding Core Gaming PC Components
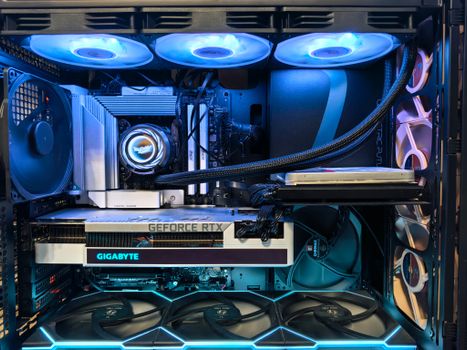
Vividly lit PC components showcasing modern technology and design. Photo: Dave Morgan / Pexels
Embarking on the journey of how to build a gaming PC begins with a thorough understanding of its fundamental components. Each part plays a crucial role in your system's overall performance, and choosing wisely is paramount to achieving your desired gaming experience. The Central Processing Unit (CPU), often called the 'brain' of your computer, handles all general computations and game logic. For gaming, you'll want a CPU with high clock speeds and a good number of cores, typically from Intel's Core i5/i7/i9 series or AMD's Ryzen 5/7/9 series. Don't skimp here, as a powerful CPU ensures smooth gameplay, especially in CPU-intensive titles and for multitasking. Next, and arguably the most critical component for gaming, is the Graphics Processing Unit (GPU), or graphics card. This powerhouse renders all the visuals you see on your screen. The higher the resolution and refresh rate you aim for, the more powerful your GPU needs to be. Brands like NVIDIA (GeForce RTX series) and AMD (Radeon RX series) dominate this market, offering a range of cards to suit various budgets and performance targets. Your choice here will directly impact frame rates and graphical fidelity. Exploring specific GPU models and their performance benchmarks is highly recommended before making a decision. The Motherboard acts as the central nervous system, connecting all your components and allowing them to communicate. Compatibility is key here: your motherboard must support your chosen CPU socket (e.g., LGA 1700 for Intel, AM5 for AMD), RAM type (DDR4 or DDR5), and have enough slots for your storage and expansion needs. Features like Wi-Fi, USB port count, and RGB headers can also influence your choice. While it doesn't directly impact gaming performance as much as the CPU or GPU, a good quality motherboard ensures stability and provides options for future upgrades. Random Access Memory (RAM) is your system's short-term memory, used to store data that the CPU needs to access quickly. For modern gaming, 16GB of DDR4 or DDR5 RAM is considered the sweet spot, with 32GB becoming increasingly popular for high-end systems and future-proofing. Look for higher clock speeds (MHz) and lower latencies (CL) for better performance. Storage solutions come in two primary forms: Hard Disk Drives (HDDs) and Solid State Drives (SSDs). HDDs offer large capacities at a lower cost, suitable for bulk storage of games you don't play frequently. However, for your operating system, frequently played games, and applications, an NVMe M.2 SSD is essential. These offer vastly superior read/write speeds, drastically reducing boot times and game loading screens. A common setup involves a smaller, fast NVMe SSD for the OS and a few favorite games, complemented by a larger SATA SSD or HDD for additional storage. The Power Supply Unit (PSU) provides electricity to all your components. It's crucial not to underestimate its importance. A reliable PSU with sufficient wattage (usually 650W to 850W for a mid-range to high-end gaming PC, depending on GPU) and a good efficiency rating (e.g., 80 Plus Gold) is vital for system stability and longevity. Never compromise on PSU quality. Finally, the PC Case houses all these components, provides airflow, and contributes significantly to your build's aesthetics. Consider factors like size (ATX, Micro-ATX, Mini-ITX), cooling potential (fan mounts, radiator support), cable management features, and overall design when selecting your case. Each component, carefully chosen and compatible with the others, forms the backbone of a powerful and enjoyable gaming machine.

Planning Your Gaming PC Build and Budgeting Smartly

Before you even think about purchasing components or grabbing a screwdriver, the most crucial step in how to build a gaming PC is meticulous planning and smart budgeting. This phase sets the foundation for your entire project, ensuring you achieve your performance goals without overspending or encountering compatibility nightmares. Begin by defining your primary use case. While the goal is a gaming PC, consider what kind of games you'll be playing most often. Are you a competitive esports player aiming for high frame rates at 1080p, or an immersive single-player enthusiast targeting stunning visuals at 1440p or even 4K? Your target resolution and desired frame rate (e.g., 60fps, 144fps, 240fps) will heavily influence the power of the GPU and CPU you'll need. Don't forget other potential uses like streaming, video editing, or content creation, as these might require more cores or RAM. Once your performance targets are clear, establish a realistic budget. This isn't just about the components; remember to factor in peripherals like a monitor (especially if upgrading to match your PC's capabilities), keyboard, mouse, and operating system license (e.g., Windows 11). A common mistake is allocating too much to the CPU or GPU and neglecting other critical parts. A general rule of thumb for a balanced gaming PC is to dedicate roughly 30-40% of your budget to the GPU, 15-20% to the CPU, 10-15% to the motherboard, 5-10% to RAM, 5-10% to storage, 5-8% to the PSU, and 5-10% to the case and cooling. These are rough guidelines and can shift based on specific deals or your priorities. Component compatibility is paramount. Tools like PCPartPicker.com are invaluable for this stage. You can select each component, and the website will automatically flag any known compatibility issues, such as an incompatible CPU socket with your motherboard or a PSU that lacks sufficient connectors for your GPU. This tool also helps you track prices from various retailers, making it easier to find the best deals. Don't just look for the cheapest parts; research reviews and benchmarks for each component. A slightly more expensive but significantly better-performing or more reliable part can save you headaches and provide a better experience in the long run. Consider future-proofing to some extent, especially if your budget allows. While you can't future-proof indefinitely, choosing a motherboard with a newer socket (like AM5 for AMD or LGA 1700 for Intel) and DDR5 RAM can provide an upgrade path for your CPU and memory down the line. Similarly, a slightly higher wattage PSU than strictly necessary can accommodate a more powerful GPU upgrade later. However, don't overspend excessively on future-proofing if it means compromising on current performance. The goal is a balanced system that meets your immediate needs and offers reasonable upgrade potential. Take your time during this planning phase, read reviews, watch build guides, and don't hesitate to ask for advice in online communities. A well-planned build is a successful build.

Step-by-Step Assembly: Bringing Your Gaming Rig to Life

With your components meticulously chosen and gathered, the exciting part of how to build a gaming PC truly begins: the assembly. While it might seem daunting, breaking it down into manageable steps makes the process straightforward and enjoyable. Before you start, ensure you have a clean, well-lit workspace with plenty of room. Gather your tools: a Phillips head screwdriver (magnetic tip is a bonus), zip ties or Velcro straps for cable management, and anti-static precautions (an anti-static wrist strap connected to a grounded metal object, or frequently touching a grounded metal object like your PC case before handling components). Static electricity is the silent killer of PC parts, so never skip this step. Begin by installing the CPU onto the Motherboard. Carefully open the CPU socket lever, align the CPU's golden triangle with the triangle on the socket, and gently place the CPU into the socket without forcing it. Close the lever to secure it. Next, install the CPU Cooler. If it's an air cooler, apply thermal paste (if not pre-applied) and mount the heatsink according to the manufacturer's instructions. For an AIO (All-In-One) liquid cooler, mount the CPU block first, then the radiator to the case. After the CPU and cooler, install the RAM. Open the clips on the RAM slots, align the RAM stick with the notch, and press down firmly on both ends until the clips snap into place. For dual-channel performance, consult your motherboard manual for the correct slots (usually slots 2 and 4). Proper RAM installation is crucial for system stability. Next comes the Storage. If you have an NVMe M.2 SSD, locate the M.2 slot(s) on your motherboard (often under a heatsink), gently insert the SSD at an angle, and secure it with the small screw. For SATA SSDs or HDDs, mount them into the drive bays in your case, then connect a SATA data cable from the drive to the motherboard, and a SATA power cable from the PSU. Now, it's time to install the Motherboard into the PC Case. Install the I/O shield (if not integrated) into the case opening. Carefully lower the motherboard into the case, aligning it with the standoff screws. Secure it with the motherboard screws, ensuring not to overtighten. Once the motherboard is in, install the Graphics Card (GPU). Locate the primary PCIe x16 slot, open the retention clip, align the GPU, and push it firmly into the slot until the clip engages. Secure it to the case with screws. Wiring is often considered the most challenging part, but patience is key. Connect the main 24-pin ATX power cable from the PSU to the motherboard, and the 8-pin (or 4+4-pin) CPU power cable. Connect the PCIe power cables to your GPU (usually 6-pin, 8-pin, or a combination). Connect case fan headers to the motherboard, and plug in the front panel connectors (power button, reset button, USB ports, audio jacks) – these are often tiny and require careful attention to your motherboard manual. Finally, route all cables neatly behind the motherboard tray and use zip ties or Velcro straps to manage them, improving airflow and aesthetics. Double-check all connections before attempting your first boot. This meticulous approach will ensure a successful and satisfying build.

First Boot, OS Installation, and Essential Gaming PC Tips

After the triumphant moment of physically assembling your gaming PC, the next crucial phase involves bringing it to life, installing your operating system, and optimizing it for the best gaming experience. This stage is just as important as the hardware assembly in ensuring your how to build a gaming PC project is a resounding success. First, connect your monitor, keyboard, and mouse. Double-check all power connections to the motherboard, CPU, GPU, and storage. With bated breath, press the power button on your case. If all goes well, you should see your monitor light up, displaying the motherboard's splash screen or BIOS interface. If nothing happens, don't panic! Troubleshoot by checking all power connections, ensuring RAM is fully seated, and verifying your monitor input. Most motherboards have diagnostic LEDs or a POST code display that can help pinpoint issues. Once you reach the BIOS (Basic Input/Output System), take a moment to ensure all your components are recognized. Check that your RAM is running at its advertised speed (you might need to enable an XMP or DOCP profile), and that your storage drives are detected. Save and exit the BIOS. Now, it's time to install your operating system, typically Windows 10 or Windows 11. You'll need a USB flash drive with a Windows installation media created using Microsoft's Media Creation Tool. Insert the USB drive, restart your PC, and boot from the USB drive (you might need to change the boot order in BIOS). Follow the on-screen prompts to install Windows onto your primary NVMe SSD. After Windows is installed, the work isn't over. You'll need to install all necessary drivers. Start with your motherboard chipset drivers, then your GPU drivers (download the latest from NVIDIA or AMD's official websites), and finally, any other peripheral drivers (Wi-Fi, audio, etc.). Outdated or missing drivers can severely impact performance and stability. Once drivers are installed, run Windows Update to get the latest security patches and system improvements. For optimal gaming performance, consider these essential tips. Keep your drivers updated regularly; both GPU and chipset drivers receive frequent updates that can boost performance or fix bugs. Monitor your temperatures using software like HWMonitor or MSI Afterburner to ensure your CPU and GPU aren't overheating, which can lead to throttling. Good airflow within your case is critical, so ensure your case fans are configured for optimal intake and exhaust. Overclocking your CPU or GPU can yield extra performance, but proceed with caution and research, as it can increase heat and power consumption. Finally, keep your operating system clean by uninstalling unnecessary programs and periodically defragmenting HDDs (never SSDs). With these steps, your custom-built gaming PC will be ready to deliver an unparalleled gaming experience.

Comparison

FeaturePre-Built PCDIY Gaming PCGaming Laptop
Cost EfficiencyOften higher for similar specsSignificantly lowerHighest for similar specs
UpgradeabilityLimited, proprietary partsExcellent, modular componentsVery limited, RAM/storage only
Performance/PriceGood, but less flexibleBest value for moneyCompromised for portability
CustomizationMinimal aesthetic choiceFull control over aesthetics & partsMostly cosmetic, limited hardware
TroubleshootingManufacturer supportSelf-reliance, community supportManufacturer support
Learning Curve
Portability

What Readers Say

"Following this guide made learning how to build a gaming PC incredibly straightforward. I saved hundreds compared to a pre-built and have a machine that perfectly fits my needs. The component breakdown was especially helpful!"

Alex P. · Seattle, WA

"I was intimidated by the idea of building my own PC, but this article demystified the process. The step-by-step instructions were clear, and my new gaming rig runs flawlessly. Highly recommend for any first-time builders."

Sarah L. · Austin, TX

"My old PC was struggling, and after reading this, I decided to take the plunge. My new DIY gaming PC now consistently hits 144fps on my favorite games, a huge improvement. The budgeting tips were a lifesaver."

Mike R. · Orlando, FL

"This guide is fantastic, though I wish there was a bit more detail on specific cable management techniques. Still, it got me through my first build successfully, and I'm proud of the result. Definitely empowering!"

Chloe B. · Denver, CO

"As someone who builds PCs for friends, I found this article to be an excellent resource for beginners. It covers all the crucial aspects of how to build a gaming PC without getting overly technical, perfect for a first-timer."

David K. · Chicago, IL

Frequently Asked Questions

Is building a gaming PC really cheaper than buying a pre-built one?

In most cases, yes. When you build your own gaming PC, you avoid the labor costs and profit margins that manufacturers and retailers add to pre-built systems. This allows you to get better components for the same price, or achieve the same performance for less money. The savings can often be significant, especially on mid-range to high-end systems.

How difficult is it to build a gaming PC for a beginner?

Building a gaming PC is far less difficult than many imagine. It's often compared to assembling LEGOs, albeit with more delicate parts and specific instructions. With patience, careful attention to detail, and a good guide like this one, most beginners can successfully build a PC. The biggest hurdle is often overcoming initial apprehension.

What tools do I need to build a gaming PC?

The essential tools are quite minimal: primarily a Phillips head screwdriver (a magnetic tip is highly recommended to avoid dropping tiny screws). An anti-static wrist strap is also crucial to protect components from static electricity. Optional tools include zip ties or Velcro straps for cable management, and a pair of small cutters for zip ties.

How much should I budget for a decent gaming PC?

A decent gaming PC capable of 1080p gaming at high settings can typically be built for $800-$1200. For 1440p gaming or higher refresh rates, you're looking at $1200-$2000+. High-end 4K or enthusiast builds can easily exceed $2500. Remember to include the cost of peripherals and an operating system in your total budget.

Should I choose Intel or AMD for my CPU?

Both Intel and AMD offer excellent CPUs for gaming. Intel traditionally held an edge in single-core performance, crucial for many games, while AMD excelled in multi-core tasks. In recent generations, both companies have become highly competitive across the board. Your choice often comes down to specific price/performance benchmarks for the games you play, and ecosystem preferences (motherboard chipsets, upgrade paths).

Who should consider building their own gaming PC?

Anyone looking for maximum performance for their money, full control over component selection, a personalized aesthetic, or simply the satisfaction of a DIY project should consider building their own gaming PC. It's also ideal for those who want to understand their hardware better and have easier upgrade paths in the future.

What are the common mistakes to avoid when building a PC?

Common mistakes include not checking component compatibility, forgetting to install the I/O shield, not fully seating RAM or GPU, forgetting to connect all power cables (especially the CPU power), improper thermal paste application, and neglecting cable management. Patience and double-checking every step are your best defenses against these issues.

What are the future trends in gaming PC hardware?

Future trends include continued advancements in CPU core counts and efficiency, more powerful and power-efficient GPUs, widespread adoption of DDR5 RAM, faster PCIe 5.0 storage and connectivity, and more sophisticated cooling solutions. AI integration (e.g., DLSS, FSR) will also continue to play a significant role in improving gaming performance and visuals.

Ready to unlock unparalleled gaming performance and the satisfaction of building your own machine? Follow this comprehensive guide on how to build a gaming PC and embark on a rewarding journey that puts you in complete control of your ultimate gaming experience. Your perfect custom rig awaits!

Topics: how to build a gaming PCcustom gaming computerPC building guidegaming PC componentsDIY gaming PC
Leo List
Brampton weed
Adultwork