✓ Building a PC can save you money compared to pre-builts.
✓ You gain full control over component selection and future upgrades.
✓ No specialized tools are required beyond a screwdriver.
✓ The process is modular and surprisingly straightforward for beginners.
How It Works
1
Plan Your Build & Budget
Determine your PC's primary use (gaming, work, etc.) and allocate a realistic budget for components. Research compatible parts based on your performance goals.
2
Gather Components & Tools
Purchase all necessary parts, including CPU, GPU, RAM, storage, motherboard, PSU, and case. Ensure you have basic tools like a Philips head screwdriver.
3
Assemble Core Components
Install the CPU, CPU cooler, and RAM onto the motherboard outside the case. This makes the initial, delicate steps easier to manage.
4
Integrate & Test
Mount the motherboard, install the graphics card, storage, and connect all power supply cables. Perform an initial boot test before final cable management.
Understanding Your PC's Core Components: The Foundation
Photo: Andrey Matveev / Pexels
Embarking on the journey of how to build a custom PC begins with a fundamental understanding of its core components. Think of these as the vital organs of your machine, each playing a crucial role in its overall performance and functionality. Getting this right is paramount, as incompatible or underpowered parts can lead to bottlenecks or even prevent your system from booting. We'll break down the key players you need to consider.
First up is the **Central Processing Unit (CPU)**, often called the 'brain' of the computer. Manufacturers like Intel and AMD dominate this space, offering a range of processors from budget-friendly options to high-end powerhouses. Your CPU choice dictates how fast your computer can execute instructions and perform calculations. For gaming, a strong multi-core CPU is beneficial, while for professional tasks like video editing or 3D rendering, core count and clock speed become even more critical. Ensure your chosen CPU is compatible with your motherboard's socket type (e.g., LGA 1700 for Intel, AM5 for AMD).
Next, we have the **Graphics Processing Unit (GPU)**, also known as the graphics card. For gamers, content creators, and anyone involved in graphically intensive tasks, the GPU is arguably the most important component. Nvidia (GeForce series) and AMD (Radeon series) are the primary contenders. A powerful GPU renders images, videos, and animations, directly impacting frame rates in games and rendering times in creative applications. Integrated graphics, found on some CPUs, are suitable for basic tasks but insufficient for serious gaming or demanding visual workloads. Always check the GPU's power requirements against your chosen Power Supply Unit (PSU).
Then there's the **Motherboard**, the central nervous system that connects and allows communication between all other components. It houses the CPU socket, RAM slots, PCIe slots for GPUs and expansion cards, and various ports for storage and peripherals. Motherboards come in different form factors (ATX, Micro-ATX, Mini-ITX) which determine their size and the number of expansion slots. Compatibility with your CPU is non-negotiable – an Intel CPU requires an Intel-compatible chipset, and an AMD CPU requires an AMD-compatible chipset. Understanding how motherboards work is crucial for a successful build.
**Random Access Memory (RAM)** acts as your computer's short-term memory, storing data that the CPU needs to access quickly. More RAM generally means your computer can handle more applications and larger files simultaneously without slowing down. For most users, 16GB is a good starting point, while 32GB or more is ideal for heavy gaming, content creation, or virtualization. RAM comes in generations (DDR4, DDR5) and speeds (measured in MHz). Ensure your RAM is compatible with your motherboard's slots and supports its speed capabilities.
Finally, **Storage** is where your operating system, programs, and files reside permanently. The two main types are Hard Disk Drives (HDDs) and Solid State Drives (SSDs). HDDs offer large capacities at a lower cost, ideal for mass storage. SSDs, particularly NVMe M.2 drives, are significantly faster, leading to quicker boot times, faster application loading, and snappier overall system responsiveness. A common strategy is to use a smaller, fast NVMe SSD for the operating system and frequently used programs, complemented by a larger HDD or SATA SSD for less critical data. Choosing the right storage solution dramatically impacts your daily computing experience and is a key consideration when planning how to build a custom PC.
Planning Your PC Build: Compatibility, Budget, and Tools
Photo: Andrey Matveev / Pexels
Before you even think about installing a single component, meticulous planning is the cornerstone of a successful custom PC build. This phase involves three critical elements: ensuring compatibility between parts, establishing a realistic budget, and gathering the necessary tools. Skipping or rushing this step can lead to frustration, wasted money, and a non-functional system.
**Component Compatibility** is paramount. Every major component – CPU, motherboard, RAM, and GPU – must be able to work together harmoniously. The CPU socket on your motherboard must match your chosen CPU (e.g., AMD's AM5 socket for Ryzen 7000 series, Intel's LGA 1700 for 12th, 13th, and 14th gen Core processors). RAM must be the correct generation (DDR4 or DDR5) and fit the slots on your motherboard; consult your motherboard's manual for supported speeds and capacities. Your graphics card will typically connect to a PCIe x16 slot, which is standard on most motherboards, but ensure your power supply has the necessary PCIe power connectors for your GPU. Don't forget about your CPU cooler, too – it must be compatible with your CPU socket and fit within your chosen PC case, clearing RAM modules and case panels. Websites like PCPartPicker.com are invaluable resources for checking compatibility automatically and flagging potential issues before you buy.
**Budgeting** is another crucial aspect. Building a custom PC offers incredible flexibility, but it's easy to get carried away. Start by defining your PC's primary purpose. Is it a high-end gaming machine, a workstation for video editing, a budget-friendly office PC, or a home theater PC (HTPC)? This will help you prioritize where to allocate the most funds. For example, a gaming PC will demand a larger portion of the budget for the GPU, while a workstation might prioritize the CPU and RAM. Research the average cost of components for your desired performance tier. Remember to factor in peripherals (monitor, keyboard, mouse), an operating system license (Windows, Linux), and potentially a UPS (Uninterruptible Power Supply) for power protection. A common mistake is to overspend on one component while neglecting others, creating a bottleneck that limits overall performance. Aim for a balanced build where no single component significantly outpaces the others in terms of performance potential, unless there's a very specific use case that demands it.
Finally, **Gathering Your Tools** is straightforward. You don't need a specialized workshop to learn how to build a custom PC. The most essential tool is a **Philips head screwdriver**, preferably magnetized to prevent dropping tiny screws into hard-to-reach places. An **anti-static wrist strap** is highly recommended to prevent electrostatic discharge (ESD) from damaging sensitive components; alternatively, work on a non-carpeted surface and periodically touch a grounded metal object (like your PC case's unpainted metal) before handling components. **Zip ties or Velcro straps** will be invaluable for cable management, making your build look clean and improving airflow. A **headlamp or flashlight** can be surprisingly useful for illuminating dark corners inside the case. Finally, a pair of **small snips or wire cutters** can help with zip ties. Having these basic tools ready before you start will ensure a smooth and efficient assembly process, minimizing interruptions and potential frustrations. Take your time during this planning phase; it will pay dividends during the actual build.
Step-by-Step Assembly: Bringing Your Vision to Life
Photo: Andrey Matveev / Pexels
With your components acquired and your workspace prepared, it's time for the most exciting part of how to build a custom PC: the assembly. This process is modular and systematic. By following these steps carefully, you'll minimize errors and ensure a smooth build.
**1. Prepare the Motherboard:** Lay your motherboard on its anti-static bag or on a clean, non-conductive surface. This is often easier to do outside the case. First, install the **CPU**. Open the CPU socket lever, align the triangle/arrow on the CPU with the corresponding mark on the socket, and gently drop the CPU in. Do not force it. Close the lever to secure it. Next, install the **CPU Cooler**. If using the stock cooler, apply thermal paste if it's not pre-applied, then mount it according to its instructions. For aftermarket coolers, follow their specific mounting hardware instructions. Finally, install the **RAM**. Open the clips on the RAM slots, align the notch on the RAM stick with the notch in the slot, and press firmly on both ends until the clips snap into place. Consult your motherboard manual for the correct slots to use for dual-channel memory configuration.
**2. Install the Power Supply Unit (PSU):** Most cases have a dedicated compartment for the PSU, usually at the bottom. Slide the PSU into its bay and secure it with screws from the back of the case. For modular PSUs, it's often easier to connect the necessary cables to the PSU before mounting it, especially the main 24-pin ATX, 8-pin CPU power, and any PCIe power cables for your GPU and SATA power for drives.
**3. Mount the Motherboard:** Before installing the motherboard, ensure the **I/O shield** (if not integrated into the motherboard) is snapped into place in the case's rear opening. Then, carefully lower the motherboard into the case, aligning it with the standoffs. These are small risers that prevent the motherboard from shorting against the case. Secure the motherboard with screws, but don't overtighten them. Once the motherboard is in place, connect the main 24-pin ATX power cable and the 8-pin CPU power cable from the PSU to the motherboard.
**4. Install Storage Drives:** For NVMe M.2 SSDs, locate the M.2 slot(s) on your motherboard (often under a heatsink), insert the drive at an angle, and secure it with the tiny screw provided. For 2.5-inch SSDs or 3.5-inch HDDs, mount them into the drive bays of your case (these often have tool-less trays or require screws). Connect SATA data cables from the drives to the SATA ports on your motherboard, and SATA power cables from the PSU to the drives.
**5. Install the Graphics Card (GPU):** Open the latch on the PCIe x16 slot (usually the top-most reinforced slot). Align your GPU with the slot and press it firmly into place until the latch clicks. Secure the GPU to the case with screws. Connect the necessary PCIe power cables from your PSU to the GPU. High-end GPUs may require two or three 8-pin power connectors.
**6. Connect Front Panel Connectors and Case Fans:** This is often considered the trickiest part due to the small, unlabeled connectors. Refer to your motherboard manual to correctly connect the power button, reset button, USB ports, audio jacks, and LED indicators from your case's front panel to the motherboard headers. Connect your case fans to the fan headers on your motherboard. Proper fan placement and airflow optimization are key for cooling.
**7. Initial Boot and Cable Management:** Before closing everything up, perform an initial boot test. Connect a monitor, keyboard, and mouse. Power on your system. If it POSTs (Power-On Self-Test) and displays the BIOS screen, you're in good shape! If not, troubleshoot connections. Once confirmed working, power down and manage your cables. Route cables behind the motherboard tray and use zip ties or Velcro straps to bundle them neatly. This improves airflow and aesthetics. Close up your case, install your operating system, and enjoy your custom-built PC!
Troubleshooting Common Issues and Essential Post-Build Steps
Photo: Beyzanur K. / Pexels
Even the most experienced builders encounter issues, especially when learning how to build a custom PC for the first time. Knowing how to troubleshoot common problems can save you hours of frustration. After a successful assembly, there are crucial post-build steps to ensure your system runs optimally and securely.
**Common Troubleshooting Scenarios:**
* **No Power / No POST (Power-On Self-Test):** This is the most common and often the most daunting. First, check all power connections: the 24-pin ATX, 8-pin CPU, and GPU power cables. Ensure the PSU is switched on at the back and plugged into a working outlet. Double-check front panel connections for the power button. If still no POST, try 'breadboarding' – taking the motherboard out, installing only CPU, cooler, and one stick of RAM, and trying to boot. This eliminates the case and other components as potential issues.
* **No Display:** If the PC powers on but nothing shows on the monitor, ensure your monitor is plugged into the *graphics card* (if you have one) and not the motherboard's integrated graphics port. Check the monitor's input source. Reseat the GPU and RAM sticks.
* **Random Restarts / Blue Screens of Death (BSODs):** These often point to unstable RAM, an overheating CPU (check cooler installation and thermal paste), or a faulty power supply. Run memory diagnostic tools (like MemTest86) and monitor CPU temperatures with software like HWMonitor.
* **Peripherals Not Working:** Check USB connections, ensure drivers are installed for specialized devices, and try different USB ports.
* **BIOS Not Detecting Storage:** Ensure SATA data and power cables are securely connected. Check your motherboard's BIOS/UEFI settings to see if the drives are recognized.
**Essential Post-Build Steps:**
1. **Install Operating System:** Once your PC successfully POSTs, install your preferred operating system (Windows, Linux, etc.) from a USB drive. Follow the on-screen instructions for setup.
2. **Install Drivers:** This is critical. After OS installation, install chipset drivers from your motherboard manufacturer's website, then your graphics card drivers (from Nvidia or AMD's website), and finally any other peripheral drivers. Outdated or missing drivers can lead to performance issues and instability.
3. **Update BIOS/UEFI:** While not always necessary immediately, updating your motherboard's BIOS to the latest version can improve stability, add support for newer CPUs/RAM, and fix bugs. Follow your motherboard manufacturer's instructions carefully, as a failed BIOS update can brick your motherboard.
4. **Install Essential Software & Benchmarking:** Install your web browser, antivirus software, and other daily applications. Consider running benchmarks (e.g., Cinebench, 3DMark) to ensure your system performs as expected and to identify any bottlenecks. Monitor temperatures during these tests.
5. **Cable Management (Final Touches):** Revisit your cable routing. Neat cables not only look better but also improve airflow, which contributes to better cooling and system longevity. Use zip ties or Velcro straps to secure loose cables.
6. **Backup Strategy:** Implement a backup strategy for your important data. Whether it's cloud storage, an external hard drive, or a network-attached storage (NAS) device, protecting your data is paramount. A custom PC gives you the power, but also the responsibility, to manage your digital life effectively. By being prepared for troubleshooting and diligently completing these post-build steps, you'll ensure your custom PC delivers years of reliable performance.
Comparison
Feature
Custom Build
Pre-Built PC
Gaming Laptop
Cost-Effectiveness
Excellent (more performance for dollar)
Good (convenience premium)
Fair (portability premium)
Upgradeability
Exceptional (modular components)
Limited (proprietary parts)
Very Limited (RAM, storage only)
Performance Control
Full (select exact parts)
Moderate (vendor selected)
Limited (fixed configuration)
Customization/Aesthetics
Unlimited (cases, RGB, cooling)
Moderate (limited options)
Minimal (stickers, skins)
Assembly Difficulty
Moderate (requires research/time)
Easy (plug and play)
Easy (plug and play)
Warranty
Individual component warranties
Single system warranty
Single system warranty
What Readers Say
★★★★★
"This guide made learning how to build a custom PC so much less intimidating. I saved hundreds compared to a pre-built and got exactly the gaming machine I wanted. Highly recommend following these steps!"
Alex P. · Austin, TX
★★★★★
"I was nervous about building my own PC, but the detailed component breakdown and step-by-step instructions were incredibly helpful. My first build booted up perfectly on the first try!"
Sarah K. · Seattle, WA
★★★★★
"After reading this, I successfully built a powerful editing workstation that renders videos twice as fast as my old machine. The advice on compatibility and budgeting was spot on and saved me from making costly mistakes."
Mark T. · Denver, CO
★★★★★
"While the guide was excellent, I found connecting the tiny front panel connectors a bit challenging, even with the manual. Still, the overall experience of building my own PC was incredibly rewarding and I'm thrilled with the result."
Jessica L. · Miami, FL
★★★★★
"As a student on a tight budget, this guide showed me how to build a custom PC for my engineering projects without breaking the bank. The flexibility to upgrade individual parts later is a huge plus for my future needs."
David R. · Chicago, IL
Frequently Asked Questions
Is it really cheaper to build a custom PC than buy a pre-built one?
Generally, yes. Building a custom PC often allows you to get more performance for your money because you avoid the 'builder's premium' and can hunt for deals on individual components. You also won't pay for components you don't need, leading to a more optimized spend.
Do I need any special technical skills or tools to build a PC?
No, you don't need advanced technical skills. Basic computer literacy and patience are key. The most important tool is a Philips head screwdriver. An anti-static wrist strap is highly recommended, but otherwise, standard household tools suffice.
How long does it take to build a custom PC for the first time?
For a first-time builder, expect anywhere from 3 to 6 hours for the physical assembly, not including software installation. Taking your time, consulting manuals, and watching video guides can extend this, but it's better to be thorough than rushed.
What's the most expensive component when building a gaming PC?
For a gaming PC, the Graphics Processing Unit (GPU) is almost always the most expensive component. It's responsible for rendering visuals, and high-performance GPUs can easily cost as much as all other components combined.
How does building a custom PC compare to buying a gaming laptop?
Building a custom PC offers significantly better performance-to-price ratio, superior upgradeability, and much better cooling. Gaming laptops offer portability at a higher cost, reduced performance for the price, and very limited upgrade options.
Who should consider building their own custom PC?
Anyone seeking maximum performance for their budget, specific component choices, easy future upgrades, or simply the satisfaction of creating their own machine should consider building a custom PC. It's ideal for gamers, content creators, and power users.
Can I accidentally damage components during the build?
While possible, major damage is rare if you follow instructions carefully and handle components gently. The biggest risks are static electricity (use an anti-static strap) and forcing components into place incorrectly. Always align pins and slots before applying pressure.
What are the future trends in PC building?
Future trends include increasing adoption of DDR5 RAM, PCIe 5.0 for faster storage and GPUs, more efficient power supplies, and continued advancements in cooling solutions. AI integration in hardware and software will also play a larger role in system performance.
Ready to unleash your creativity, conquer virtual worlds, or power through demanding tasks? Learning how to build a custom PC is a rewarding journey that puts you in control. Start planning your dream machine today and experience the unparalleled satisfaction of a truly personalized computing experience.

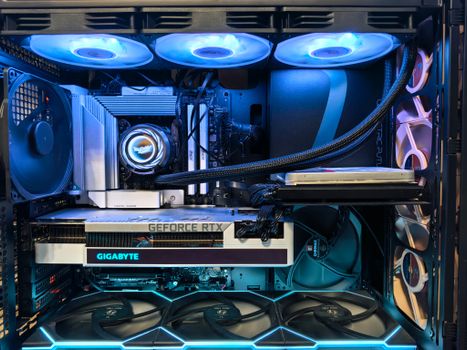 Photo: Andrey Matveev / Pexels
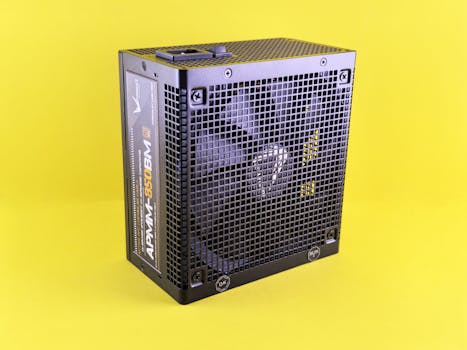 Photo: Andrey Matveev / Pexels
 Photo: Andrey Matveev / Pexels
 Photo: Beyzanur K. / Pexels